DO-IT-YOURSELF INSTRUCTIONS PUBLISHED HERE
 This winter (2017 and 2018) I have spent considerable time attempting to come up with an easy-to-use garden cover for my Keyhole Farm gardens to protect plants when Mother Nature turns a cold shoulder to my raised-bed gardens. I have tried various methods in years past but have not been fully satisfied with the results. The hassle and time it takes to put on covers and take them off when 32-degrees or less hits can be cumbersome.
Too, with error-ridden weather reports, this has become a more frequent exercise. If I hear the low will be 40, I put on covers. Often, sometime during the night, the forecast secretly changes for the upcoming hours to a low of 32 or less. So I try to play it safe.
In considering a new method I searched YouTube and various sites to see what everybody else is doing, but saw problems with most of them based on my needed application. I did consider a box-shaped unit (my design) that would use hinges on the corners and collapse into a single flat piece for storage, but weight became a problem. Then I wondered if I could re-design a Slinky toy with open ends at the bottoms, which after some serious thought resulted in Keyhole Farm’s retractable cover for raised-bed gardens.
With a ton of mathematical calculations and scientific conjuring, I came up with a design for a garden cover that I have not seen on the Internet, so right now I am calling it my invention. Someone else might be doing it, too, but I am totally unaware of it.
Rather than spending a lot of money to perhaps make a lot of money by selling these as garden cover units, I decided to offer this “how to” so that people can build their own either the way I did it or with their own inclusion of different concepts and materials.
Roughly, it cost me somewhere between $70 and $100 to build each garden cover, the parts available at just about any hardware store. The parts for these units came from Ace Hardware. Not only can a unit be built with freeze cloth or some other cold-temperature fabric, but also with netting for summer to perhaps keep birds away from tomatoes. They might make excellent abodes for pets during winter or could perhaps be taken to the beach and used as a moveable sun break to replace those weird canopies, or be fashioned into a tent. Or you could perhaps build a half-canopy against a wall for some applications. There are many possibilities.
Now, fairly upfront, let me state that long-term tests of these units have not occurred. I have had luck with them standing up well to high winds and rainy weather, but I cannot guarantee they would work for everyone.
Rather than fabricating a bunch of parts, I tried to use parts common to hardware stores and simply put them together in a fashion for the results I desired.
My first prototype differed slightly from the two succeeding prototypes in shape, but all three work well.
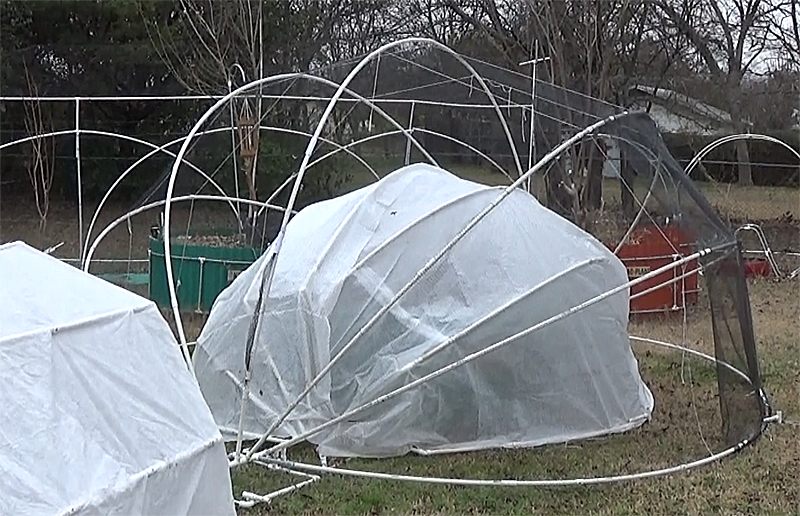
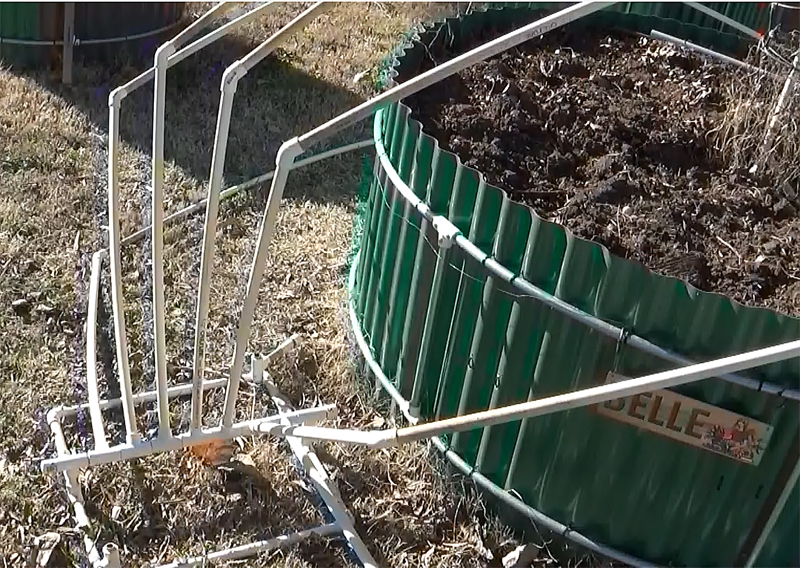
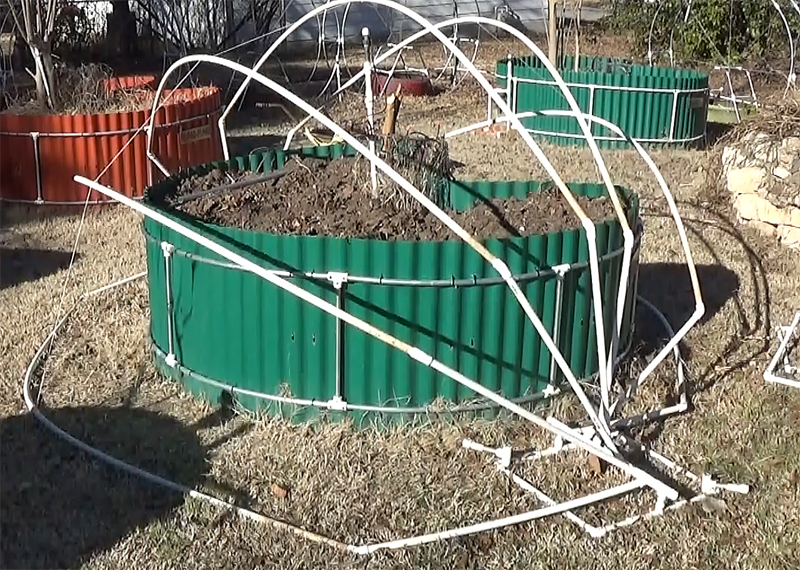
The idea is to have two “gear boxes,” each on an opposing side of the garden, and then to arch pipes attached to these boxes over the garden to which fabric or some other material is added. The finished products when rotated over the garden, look something like an igloo. When the pipes are retracted to one side, they collapse and sit on the ground in a small group. To put it back in place, simply grab the front pipe and pull it over the garden as the other pipes are pulled forward in an arch and let the first pipe sit on the ground. Because the openings at each end of the unit are on the ground, the cover is secured. Just lift up a side to enter or open it all the way to work the garden, then pull it over again to protect crops. It’s that simple.
THE GEAR BOX
 When you think of “gear box” with this concept, don’t think of a bunch of gears inside a watch or a lot of complicated moving parts. This one is quite simple. Although it did take me a lot of time to build the first one because I had to figure out how to do it without any kind of instructions (from scratch), the later attempts took about 45 minutes each, from start to finish. The gear boxes are the heart of the invention.
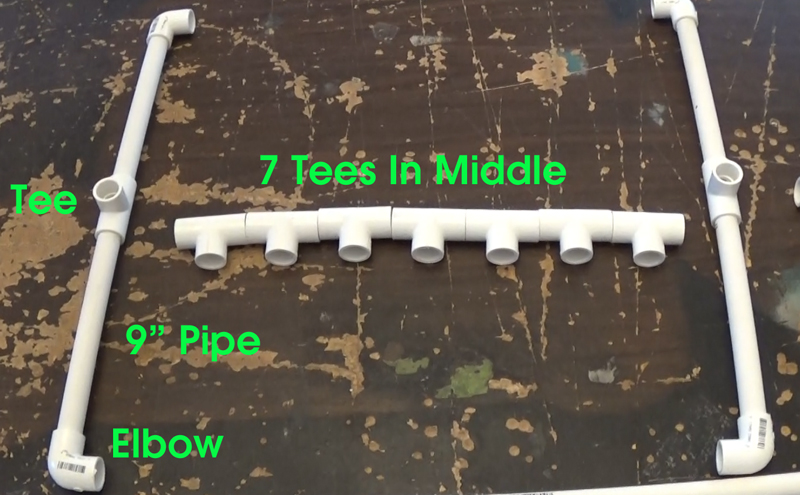
I utilized half-inch PVC pipe and fittings for most of the gear box parts, plus a 25-inch piece of EMT metal conduit (also half-inch) and some 8×3/4” tap screws to hold the parts together once assembled. Click on associated images to enlarge.
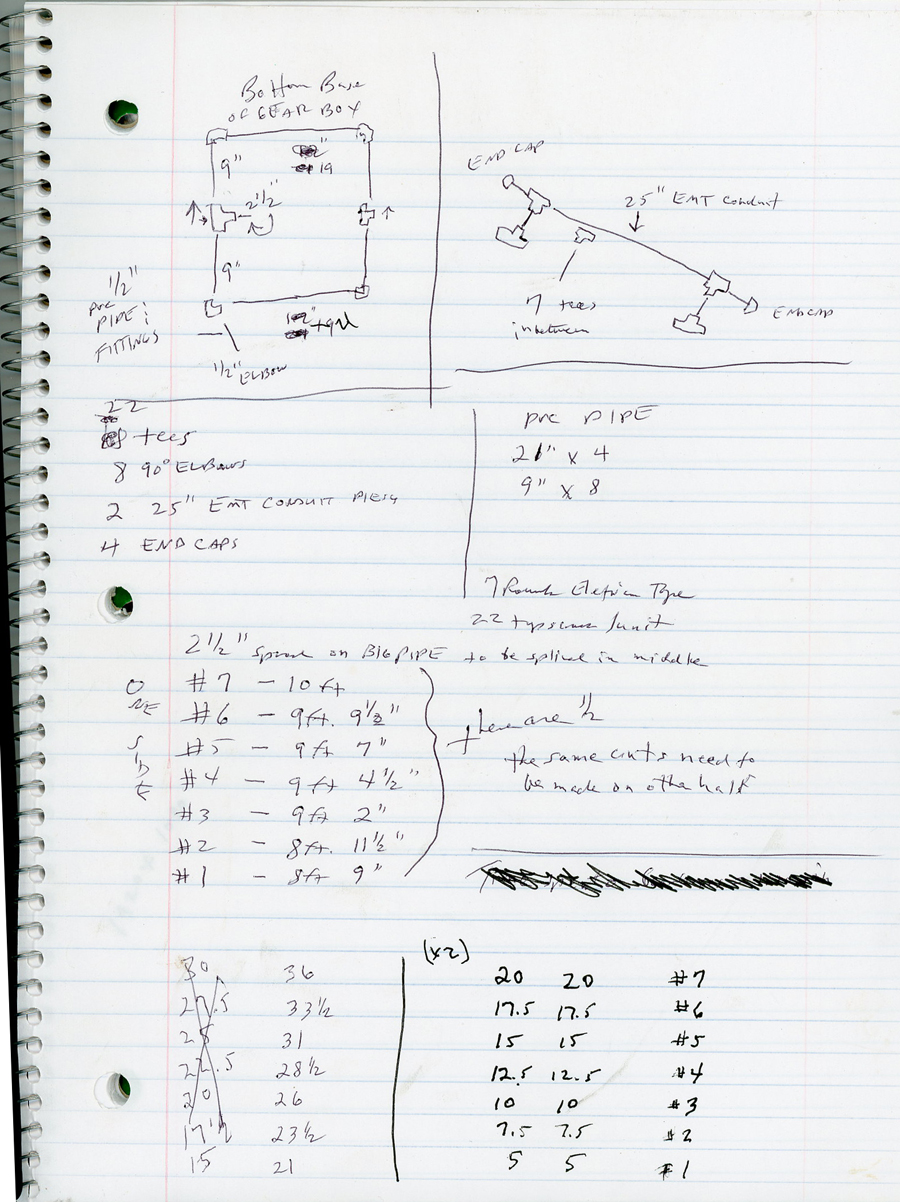
 For a gear box, I cut four pieces of half-inch PVC pipe at nine inches and two at 21 inches. These represent the base. I used four elbows for the corners and two half-inch tees pointed upward in the middle for the “gears” to inhabit. The 21-inch pipes went to two opposing sides, while the nine-inch pieces ran perpendicular to these and comprised the other sides, halved with the upward tees in the middle. Then into the upward openings of these two tees I placed a 2 ½ -inch piece of PVC pipe, pointed upward.
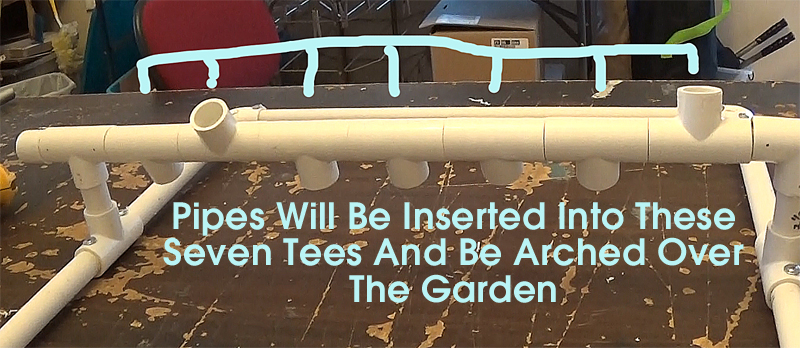
On top of these two short pieces of pipe I placed another tee on each, aimed with the center hole down and the side openings pointing sideways, parallel to the 21-inch sides. It was within the two upper tees that I slid the 25-inch piece of EMT conduit and put an end cap on one side.
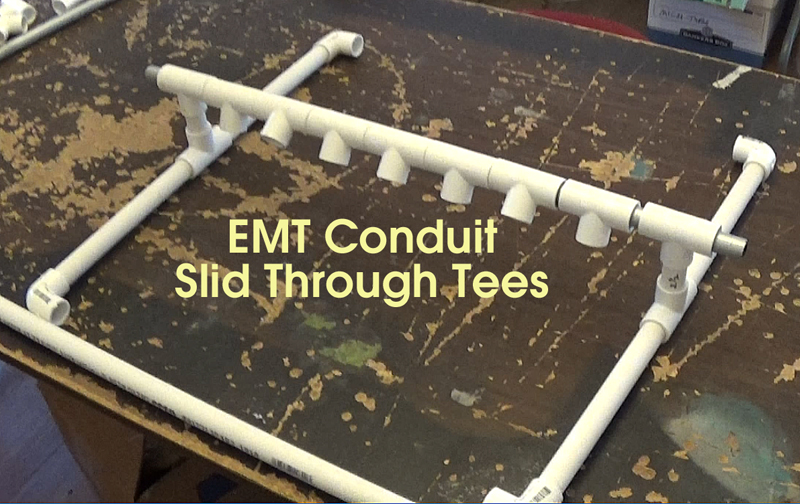 Then I backed the conduit out and installed seven more tees onto the conduit, again running parallel to the 21-inch sides with the middle opening down. I slid the conduit back into place as tees were added. I then put the conduit into the remaining solid tee slot and added an end cap to that side, too.
 Although it is half-inch EMT metal conduit, the actual circumference is actually a little less, making the pipe loose on the seven center tee pieces and the two frame pieces. The loose pipe in the middle will rotate. To secure the end caps, I wrapped seven rounds of black electrician’s tape to the ends of the conduit so that the end cap would fit securely. On one of my models, I simply drilled a tap screw partially in (sticking up a little) where the end-cap would go and it served to block the conduit piece from moving very much (only a few millimeters). This way it wouldn’t accidentally work its way out.
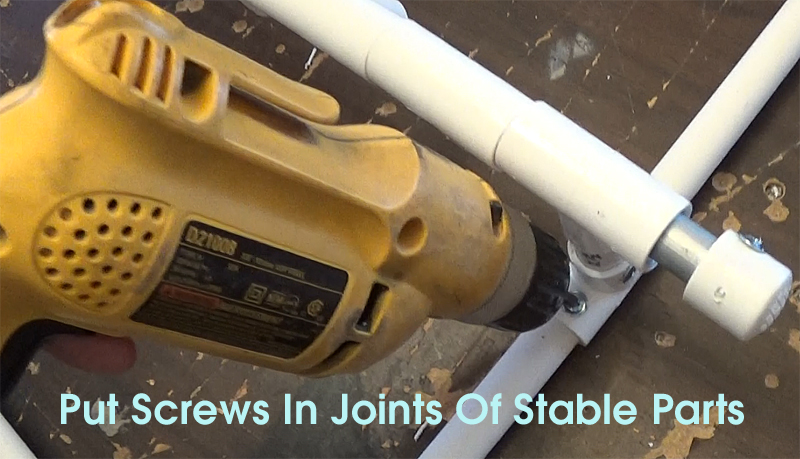
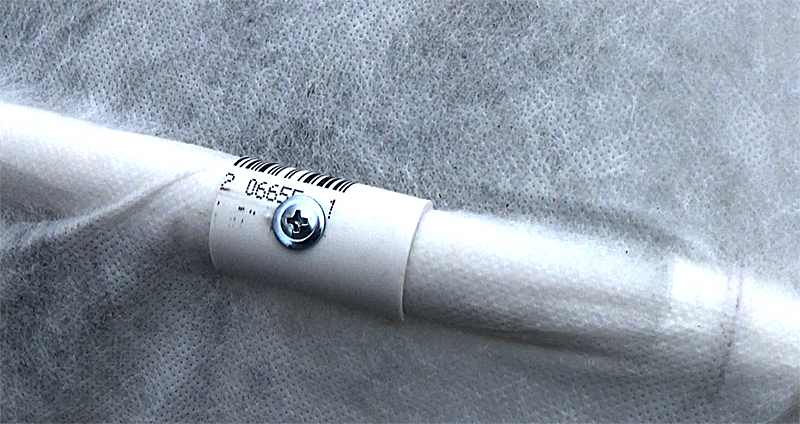
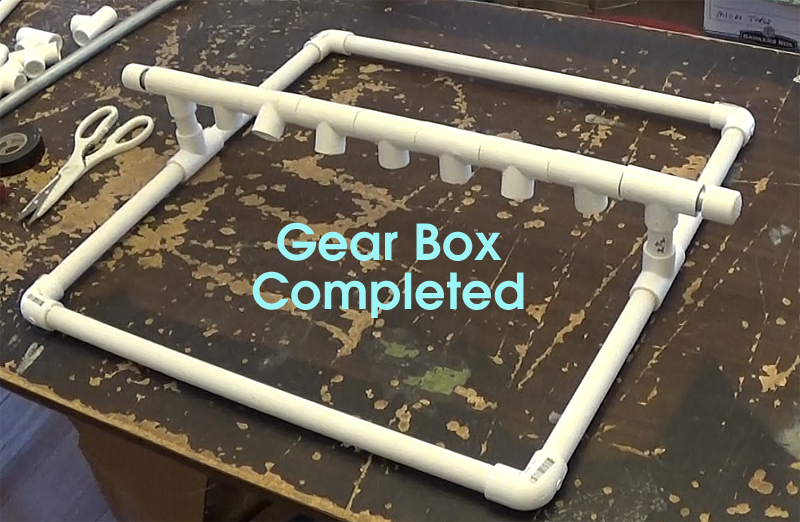 Lastly, I made sure each corner of the base touched the ground on a flat surface and then drilled a tap screw into each place where a pipe joined a fitting to assure the pipe would not separate if tugged on. These joints could also be welded (glued) into place, but this would make it more difficult to re-use the pipe and fittings or to make alterations.
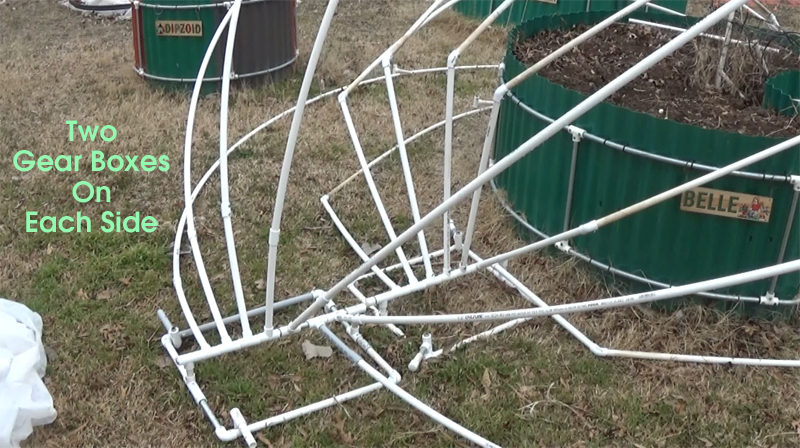
Two gear boxes like the one described above need to be made, as they will sit on opposite sides of the garden, the row of tees running perpendicular to the garden. In all, 22 tees were used, eight 90-degree elbows, two 25” EMT conduit pieces (cut from the same pipe), and four end caps, plus 44 tap screws for the two units. The PVC pipe consistedof four 21-inch pieces and eight nine-inch pieces for the two gear boxes.
 When putting it together, make sure the pipes are inserted the same (use a mallet if necessary to tap them further in) and twist the fittings so that they correctly line up. The base should sit squarely on a flat surface. See images for some details (click on the image to enlarge). Some short videos are also posted.
 THE ARCHED PIPES
For the first garden cover prototype, I used a table on which to build the unit. I decided that since this was an experiment, I would build the smaller unit first. It would accommodate our 42” diameter mini-keyhole garden kit instead of the six-foot diameter regular keyhole garden kit. I brought in a frame from a mini-kit and placed it in the middle of the table, with the gear boxes on each side, about a foot away (they barely fit on the table). On this first unit (and to determine if this would even work), I decided to place pipes straight-up to the height I wished the canopy to rise above the garden.
Next, I mentally numbered the moveable tees in the gear boxes – number one on the tees on each side closest to the garden, and number seven on the tees on each side farthest away, with consecutive numbers in-between.
I did not record the measurements of these original pipes. Each unit might differ, depending upon factors such as the height and air that a gardener prefers. I stuck these like-cut PVC pipes straight up into the seven tees on each side. I then put an elbow on each one, each facing toward the center.
Rather than “arch” the pipes on this first garden, I just used straight pipe to go across the garden. There are seven horizontal pipes, each cut a different length. Since the two #1 tees are closer to the garden, this pipe is shorter. They get longer with each successive set of tees since the tees are farther away from the center where the garden is located. Each tee connection is about 2 ½ inches longer than the previous one, so, since we are talking two sides, that’s five inches. Pretending that the pipe distance for the #1 tees is 60 inches, the next pipe would be cut at 65 inches, then 70, then 75, then 80, then 85, then 90 inches.
You would insert the 90-inch pipe into the elbows of the #7 tees first and let it drop to the side. Then the 85-inch pipe would go into the #6 tees on each side and drop onto the #7 tees, and so forth until the #1 tees have the 60-inch pipe inserted and is dropped on top of the rest. I then drilled a hole into the middle of each horizontal pipe to be used to secure a string.
When installed, the #1 and #7 pipes will sit on the ground, left and right, horizontally. The #6 and #2 pipes will be placed so that they are the approximate height of the garden. Then the #5 and #3 pipes will rise higher, at a steeper angle, over part of the garden, and the #4 pipe will be in the center. I tried to eyeball the spaces and angles between the arches to make them somewhat equal in spacing.
The string is used to tie off these sections so that they will remain stable across the garden. I rolled up a tiny piece of masking tape on the end of the string (kind of like the end of a shoestring) and fed it through the hole in the #7 pipe. Then I fed the string through the hole in the #6 pipe and cut the string with enough end to tie the pipes together at the appointed spacing. Then I fed a string through the #5 pipe and backed it to the #6 pipe where I tied both ends, again spacing appropriately. I followed this procedure until all pipes were tied and then let the unit rest on the ground with pipe #7 on the bottom. Next, I lifted pipe #1 and dragged it to the opposing side, creating the canopy.
While in this position, I also connected strings on the crooks of the elbows, each segment tied separately, to make the canopy a little sturdier. Ultimately, the fabric, when attached, will serve this purpose also. Although the straight across pipes are not arched, the angles of the pipes produces an arching effect. I then put a tap screw into each of the joints where the pipe is impacted to keep it from coming apart.
Next, I collapsed the unit so that it would be flat and I easily carried it outside and placed it upon the ground into the position I desired, so that the two gear boxes lined up with the middle of the garden and were spaced equally, about a foot from the garden. I then staked the gear boxes so that the bases would not move and lifted the canopy above and down the garden on the opposite side, with the #1 pipe traveling the farthest — from the ground on one side to the ground on the other. The #7 pipe stayed on the ground on the initial and opposite side. The strings held the intermediate pipes in place as previously measured and tied, space-wise.
It was windy that day, so I waited for a calmer day to place the freeze-cloth fabric onto the unit. The type I used was Dalen’s Gard’n Blanket. The size I chose did not fit the garden, so I had to splice some together (needle and thread). As I put the fabric into place, I used half-inch PVC clamps to snap onto the pipes, the fabric in-between, to hold it in place, and tried to pull the segments tight without moving the pipe too much. These clamps can be bought online or you can make your own. I did purchase some, but mainly used ones I made myself.
Here is a video explaining how I made them myself, but text-wise it is a simple matter of using half-inch PVC (not Schedule 40, but the thinner type), cutting it the desired length (mine averaged about two or three inches), and then cutting a slit long-wise wide enough to allow the piece to separate a little and then be forced onto the pipe. I had seen videos where people used a hack-saw to cut the slit, but I used a pair of wire cutters which was much easier. After the piece was slit, I drilled a 3/32 tiny hole on the arch of the segment about midway. Since this type of clamp can pop off, I secured them in place by putting a tap screw into them. It is easier to do with a pre-drilled starter hole in the clamp since the bit is less likely to slide off center. In all, I used about 70 such clamps per unit.
The idea with the freeze cloth was to close access from the outside atmosphere, so it needed to have a minimum of access to the cold. After the unit was covered, I used scissors to trim some of the left-over edges. I put an L-shaped stake in the ground on each side of the unit to hold it in place by rotating the stake so that the bottom of the L (upside down, like a 7) will reach slightly over the pipe. And that’s it.
THE OTHER UNITS
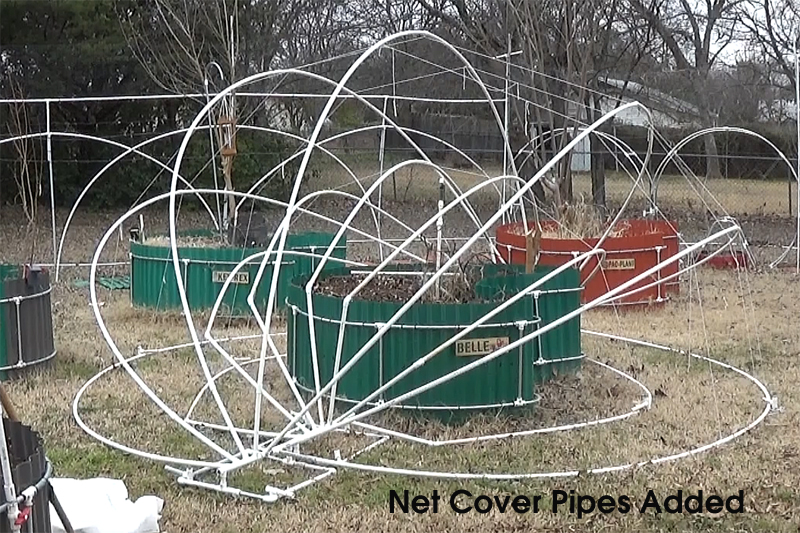
 My next experimental task was to build both a freeze-cloth and a netting unit for a regular-sized keyhole garden, putting both on the same garden, with the option of removing the freeze-cloth unit when the chance of a freeze has passed.
So I constructed four gear boxes indoors on my table (see previous section), took them outside, and placed two on one side and two on the other, slightly spaced apart, end to end, with the two units closest to the garden representing the freeze-cloth canopy and the two units farthest away the netting version. I staked them firmly into place and began with the freeze-cloth version.
 I wanted to try something different with the arching pipes. Using the same procedure with the pipe numbers as in the first garden, I decided to arch a 10-ft. length of pipe over the garden, attach a 45-degree elbow on each side of the pipes, pointed toward the middle and down, and then come down into the gear box with additional pipes of varying lengths, the #7s being 16 inches and knocking off 2 ½” on each succeeding pipe as they got closer to the middle. I had drilled the string holes in the approximate center of the 10’ pipe prior to assembling, put tap screws in the joints, tied the strings, and proceeded to install the fabric canopy as in the initial prototype.
As an experiment to protect plants from some varmints such as birds, I then began to work on the netting unit as a garden cover. I wanted it somewhat larger than the freeze-cloth unit, first so that they would not interfere with each other, but also because it might be up during the spring and summer when more massive crop outgrowths will be present, therefore more room might be needed. I decided to place two 10-ft. pieces of pipe above the garden, arched into the gear box. I had placed a connector in-between the two 10-ft. pieces and pre-drilled the string hole into the center.
 I left the #7 pipe at 20’ and then cut 2 ½ inches off each end of the next, #6, pipe. I wanted the connector to remain in the middle, necessitating two such cuts, one on each side. The next cut, on #5, was five inches on each side, which consecutively followed suit down to the #1 pipe.
When the pipes were installed into the gear box and tap screws were inserted at the joints, the string was added (as previously detailed).
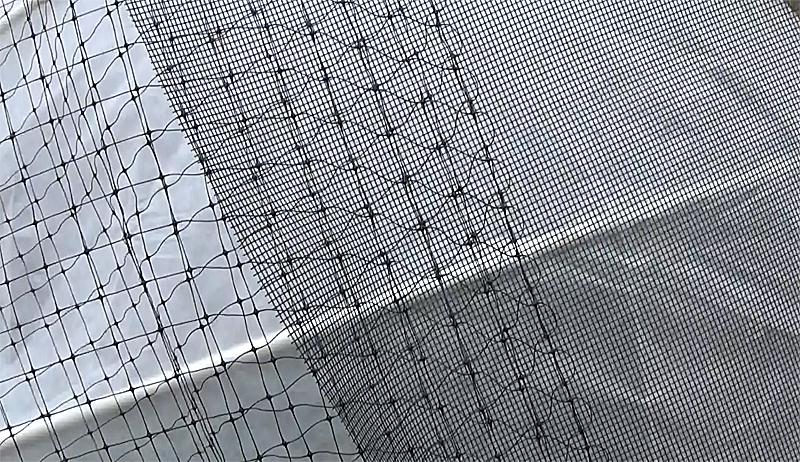
 I used left-over netting that I had lying around that had a square-shaped grid meant for deer (I don’t remember the brand) on most of the canopy, but in the area to be pulled in front I used some left-oveer charcoal fiberglass screen normally used for doors and windows. I figured it was a little stronger and would not impact plant growth in the garden. Where the pieces of netting overlapped, I put a clamp there to hold both pieces in place. I also tied a string to the center of the #1 pipe to make it easier to pull the canopy into place. Otherwise, procedures mentioned previously took place.
 To access some of the higher segments for both drilling screws into the clamps and for situating the netting or fabric, I would pull the canopy back partially and work on a segment at a time, easier to reach, which also made it easier to access the pipes on the ground.
In Closing
I had considered at length other options for the materials to be used to build these garden covers, such as bamboo, graphite rods, smaller and different types of pipe, and the list goes on. However, for me, it was much simpler to just use the parts that I am familiar with and that are easily available.
 It is very difficult to determine how much time was spent on each of these units because we were experimenting at each stage of construction and attempting to integrate various ideas into the design. When inventing, there is always the question of “If I do this, what will it cause further down the line, a pro or a con?” This was very thoroughly thought out in advance as much as possible, but you really don’t know for sure it will work until you build it.
As mentioned, the garden cover concept is untested. Only time and conditions will provide an answer as to how successful it is, but so-far, so-good. This is what “I” did. It is likely you can improve on this concept and make it fit your needs. For me, the canopies are quick to drag over and later to collapse back into their original position flat on the ground, which should make dealing with freezing weather a little easier. It only takes a few seconds. Now, as spring approaches, I can plant some of my crops earlier than usual and not be too concerned about that last freeze of the season. Putting on and removing the garden cover is easy to the extreme!